There’s a point in almost every acoustic player’s journey where a single shape turns otherwise smooth progress into hand cramps and string buzz. For many, that shape is the B dominant seventh. Guitarists often toss around the term B7, yet the grip itself can feel unforgiving until your hands learn a few small, crucial adjustments. This guide focuses on practical fixes and smart alternatives so you can use the chord confidently in real songs, not just in theory.
Why this chord matters more than you think
In the key of E, this chord is the dominant (the V7), which means it’s the engine that drives the harmony back home to E. It pops up in blues turnarounds, folk vamps, country shuffles, and early rock progressions. If you’ve ever tried a progression like E–A–(V7) and felt the energy snap back to E, you’ve heard its job in action. Learning it cleanly unlocks a lot of repertoire and makes your transitions feel intentional rather than lucky.
Set your hand up for success
- Thumb placement: Keep the thumb roughly behind the second fret on the back of the neck, not hooked over the top. This allows the index finger to arch and keeps the other fingers tall enough to ring cleanly.
- Elbow angle: Draw your fretting elbow slightly toward your ribcage. This orients your fingers more vertically so they land on their tips instead of flattening against adjacent strings.
- Guitar tilt: Tilt the headstock a bit upward and bring the guitar body closer to your torso. A small posture tweak can relieve a surprising amount of wrist strain.
The reliable open-position fingering (step by step)
Try this sequence slowly. Strum only from the 5th string downward unless noted.
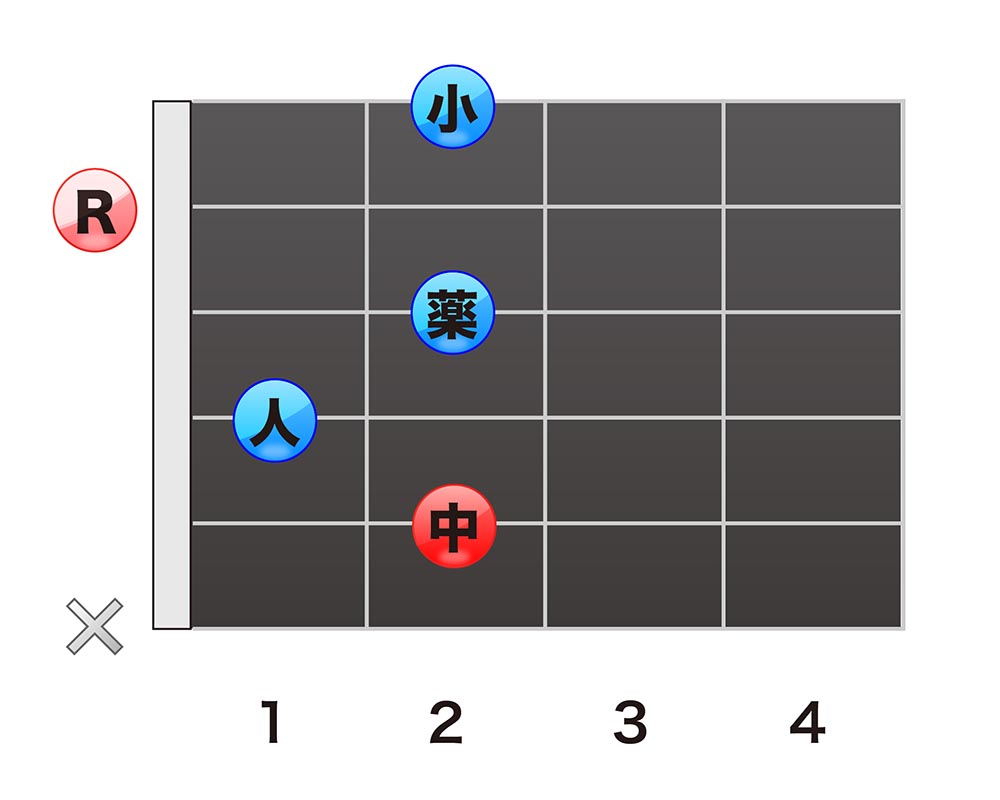
- Place your middle finger on the 5th string, 2nd fret.
- Index finger goes on the 4th string, 1st fret.
- Ring finger lands on the 3rd string, 2nd fret.
- Leave the 2nd string open.
- Pinky reaches to the 1st string, 2nd fret.
- Mute the 6th string (low E) with the tip of your middle finger or the pad of your thumb. You want silence there.
Now pluck each string individually from A to high E. If any note chokes or buzzes, adjust finger height and angle before strumming again. It’s faster to fix problems one at a time than to power through a muddy mix.
Troubleshooting the usual pain points
- Muted 2nd string: Your ring finger is likely leaning. Rotate your wrist slightly so the ring finger stands taller and uses its tip.
- Buzzy 1st string: The pinky is either too far from the fret or flattening. Nudge it closer to the fret wire and press from the knuckle, not the fingertip’s pad.
- Unwanted low E rumble: Re-check your mute. The quickest fix is to let the middle finger’s tip barely touch the 6th string so it dies on contact.
- Hand fatigue: Shake out your hand every 60 seconds and lighten your fretting pressure. If a note rings at 6/10 pressure, there’s no benefit to pressing 10/10.
When the open form still hurts: practical alternatives
You don’t have to brute-force the open grip on day one. Use alternate voicings to build endurance and musicality while your fingers adapt.
| Voicing | Strings to strum | Fret pattern | Best use case |
|---|---|---|---|
| Open form | 5–1 | x 2 1 2 0 2 | Classic folk/blues sound; easy bass note on the 5th string |
| A-shape barre at 2nd fret | 5–1 | x 2 4 2 4 2 | Even tone; quick move to E/C#m; great for mid-neck comping |
| E-shape barre at 7th fret | 6–1 (or 4–1 for tighter sound) | 7 9 7 8 7 7 | Strong, punchy voicing; handy if a song lives higher up the neck |
Capo trick for comfort: Place a capo at the 2nd fret and play an A7 shape. You’ll get the right harmony with a much friendlier grip while maintaining an open-string tone.
Watch and internalize the motion
Observe hand height, the angle of each fingertip, and how the wrist remains neutral while changing from E or A into this chord. Video is great for catching bad habits you don’t feel in the moment.
Rhythm that makes the chord sound like music
Rocking the right-hand pattern is half the battle. Try these approaches that flatter a dominant sound:
- Shuffle strum: Down on the beat, light upstroke on the ‘a’ of each beat. Think ‘DAH–da DAH–da’—let the open 2nd string sparkle.
- Arpeggio: Pick 5–3–2–1–2–3 in a slow roll. Emphasize the 5th string as your anchor bass note.
- Boom–chick: Bass note on beat 1, light strum on ‘&’, repeat on beat 3. Works perfectly in folk and country tempos.
Drill transitions that appear in real songs: E to this chord; A to this chord; and the full loop A–E–(dominant)–E. Count aloud so your right hand doesn’t freeze while the left hand adjusts.
A five-minute micro-routine that actually works
- One-minute fretting check: Place all four fretting fingers in position, release, and reset—10 slow reps focusing on clean 1st and 2nd strings.
- Mute control: Strum all six strings, but keep the 6th silent using your fretting hand. If you can’t hear the mute clearly, you’re not ready to speed up.
- Transition ladder: E to A (8 reps), A to this chord (8 reps), then E–A–this chord (8 slow reps). Increase by 5 bpm only when all notes ring.
- Groove lock: Two minutes of boom–chick at 70–80 bpm. Prioritize steady time over volume.
Theory snapshot (30 seconds)
Note spelling: B–D#–F#–A. That ‘A’ is the flat seventh that gives the dominant color. Voice-leading tip: when resolving to E, let A fall to G# and D# rise to E. If you arpeggiate slowly and hear those two motion lines, you’ll instinctively play cleaner resolutions in turnarounds.
Gear and setup that make life easier
- String gauge: On acoustic, a lighter set (e.g., .011s) reduces fingertip fatigue while you’re building the shape. You can move up later if you want more volume.
- Action: If your 12th-fret action is high, no fingering trick will feel comfortable. A quick setup from a tech (truss rod, nut, and saddle check) can transform your experience.
- Pick choice: A medium pick (0.73–0.88 mm) gives definition without harshness and helps you control those upper strings in arpeggios.
Common mistakes to retire today
- Over-gripping: More pressure does not equal cleaner tone. Aim for the minimum force that produces a buzz-free note.
- Flat fingers: If the 2nd string dies, your ring finger isn’t vertical enough. Lift the elbow slightly and replant the fingertip.
- Rushing transitions: Keep strumming and accept a few messy bars while the left hand learns. Stopping the groove slows learning more than a missed note.
Final nudge: two measurable goals
- By the end of this week, switch cleanly between E and this chord at 72 bpm, quarter notes, for 60 seconds without stopping.
- Within two weeks, play a shuffle pattern through A–E–(dominant)–E at 88 bpm with clean mutes on the 6th string every time.
Reach these, and the shape that used to stall your progress will start to feel like home. From there, adding color tones, walk-ups, and turnarounds becomes play, not punishment.